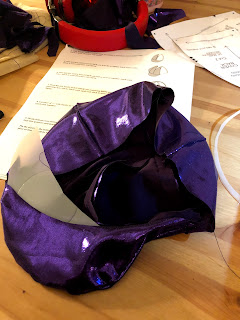
How to Make Your Own Skull Cap Cover
I have a yard of purple disco Lycra that I bought with the intent of making a tail bag for Spicy, until I was convinced tail bags are dumb. It sat unused under the bed until I had the brilliant idea to make my own Disco Pom Helmet Cover (not yet trademarked). Being a novice with the Singer, I feel like if I can accomplish this anyone can. I'm going to bestow my sewing wisdom on you so you can get down to the disco yourselves (or get a boring fabric, I don't know it's your life).
Here's what you need to get started:
- Stretchy fabric
- Thread
- Pattern
- A significant other/family member/friend who drinks milk
- A significant other/family member/friend who sews (feel free to combine #4 and #5)
- A sewing machine
- More than one machine needle (you'll probably break at least one)
- A glorious faux fur pom
- A pretty long (non-machine) needle
- Pins and/or clips
- A seam ripper
Try to use both hands and your foot to stretch the fabric a little but not too much to figure out how big each triangle is. Start drawing this:
At this point, your item from #5 (person who sews) will look at you and go, the fuck are you doing, I have made hats before and that will not turn into a hat. Briefly bristle at her lack of faith in you. What does she know? She doesn't have a pile of epic sparkle Lycra skull cap covers with poms on them. She doesn't even like poms!!! Then remember how she always tells you you're driving into a brick wall moments before you hit it and she has no skin in the game for your failure and rethink your sassy comeback. A cursory Google search reveals a PDF email of fully formed helmet silk instructions for $4.
Step 1: Print out your pattern and maybe read the instructions through end to end
It helps if your printer is set up to print single sided.
Step 2: Cut out your fabric.
Apparently fabric scissors have a 'correct' way to cut accurately with them. Still haven't figured out what that is.
Step 3: Start slappin' some triangles together.
The instructions provided a method to do this, which I promptly ignored. It ended up working out okay anyway! At one point Item #5 walked by and observed my progress, only to wonder out loud how long it could possible take someone to sew six triangles together.
Step 4a: Sew an elastic band to the bottom edge.
That way your pom won't go flying while you're trying to gallop off into the sunset.
Step 4b: Use the seam ripper to open up the brim pocket you just sewed shut.
Don't even lie to me that you didn't.
Don't even lie to me that you didn't.
Step 5: Cut a milk jug to make the brim.
Make sure you wash it. If you picked it out of your recycling like I did, it's gonna be really foul. I never thought making a helmet cover would involve so much gagging, but here we are.
Step 6: Put the brim in and sew the brim pocket shut.
The less said about this step the better. If (when) I have a second go at this, I'll make the brim and then sew the completed brim to the helmet cover because trying to put the plastic in once it was attached to the cover was really fiddly and impossible. Here's where it was advantageous to use the milk jug though: your sewing machine can sew right through it! Feel free to double sided tape the fabric to the brim to keep everything in the right place while you sew. If you have steel wool hands, use a pin. I think I stabbed myself 45 times trying to pin it together.
Step 7: Attach your pom.
I'd advise having a needle longer than the pom so you don't lose it inside the pom. If you do you might stab yourself multiple times trying to find it and then bleed all over your snow white faux fur.
Step 8: Profit.
Wear your silk with pride! When someone asks you to make them one show them the inside which is an absolute mess of botched seams and bits of broken needle trapped in it. But whatever, from the outside it looks amazing and YOU ARE A ROCKSTAR.
Tips and Tricks:
Buy the pattern, it really helped. I had to fudge it a little bit to make a skull cap (it's designed for a peaked brim) but that actually wasn't too bad. The instructions are very detailed and thorough, and worked well for a beginner sewer with ADHD who tends to pick projects well outside her ability level.
I used 100% polyester thread that I bought for backpacking projects, and nylon upholstery thread to attach the pom. Definitely go HAM on the thread.
Make sure your bobbin has enough thread on it. I would recommend double checking it as you're working so you don't sew an entire loop of elastic with no bobbin thread thereby attaching absolutely nothing. No relation to any incidents that may or may not have actually happened.
One of the top rules that has been impressed upon me about sewing is NOT to pull/push my fabric. I have to let the machine do it. When you're sewing stretchy fabric the new #1 rule is to pull your fabric to it's maximum stretch. If you don't, the second you stretch the helmet cover on all your seams are going to pop like confetti. But with less glitter.
Don't be Shangela. Make sure your foot is down.
If you attempt this I want to see!!! Unless it turned out way better than mine, then I'll just feel inadequate. Good luck and happy sewing!


I'm ded, this is hysterical
ReplyDeleteI will die a thousand deaths before I attempt to make my own helmet cover (it would go a lot worse than this if I tried) but this tutorial is fucking amazing and I snorted more than once. Also, helmet cover is bitchin.
ReplyDeleteI'm crying laughing. Well done.
ReplyDeleteI snorted so loud reading this I scared my dogs. Cici in particular was quite concerned for you, but don't worry, I showed her the final product so she knows you rock. This is amazing. Well done, you.
ReplyDeleteHaving had similar sewing experiences, this is 100% accurate. Also, bleeding on a project is basically required. It looks awesome!
ReplyDeleteThis is awesome. As is the cover itself. I do not sew. I pay lots of money to kind people on Etsy who honor my ridiculous ideas instead. So I'm extra impressed with this project!
ReplyDeleteGreat post! I won't be trying this myself but I thoroughly enjoyed reading about it!
ReplyDeleteI tried this pattern and I messed it up at the part elastic is sewed in- grrrr , any tips ? It's for my son and I ca not find any other cover pattern
ReplyDelete